How to: German Schmear Brick Fireplace
Hey friends!
Man, did we tackle the MOST AMAZZZING home improvement project ever over the weekend. I want to take a moment to thank my sweet husband for letting me talk him into tackling all the projects, all the time.. even when he is just getting back from a mission trip in Haiti- love you babe!
Now onto the good stuff... I assume if you're here reading this and you're in any way interested in home improvement, you've probably watched the HGTV show Fixer Upper. And if you've ever watched Fixer Upper, AND you're interested in home improvement, then you probably got addicted and watched every single episode about 50,000 times. Re-runs just never get old, amirite??!?!?!?!
Any way, remember the German Schmear episode where Chip and Jo schmeared the outside of a house with mortar and made it look super old and antique-y. It is one of my favorite episodes still.
Because of that episode, I was inspired to do somewhat of a similar technique on my own brick fireplace at home. We have lived here for a little over a year and I always knew I wanted to do SOMETHING to this fireplace but never could commit on what exactly to do. I went between several techniques but finally settled on "schmearing" it with joint compound.
Here is what you would need to achieve this look:
-Joint compound
*We used 6 containers of this product, but keep in mind our fireplace is HUGE, and we have 10 ft. ceilings.
-Putty Knife- metal or plastic, we used a large metal one and a small plastic one and both worked fine.
-Gallon size Ziploc bags *lots of them!*
- plastic drop cloth
How to:
First, clean and prep your brick. Dust it, wipe it down, and make sure nothing is on it that will discolor the joint compound. If you wipe it down with a wet cloth, give it enough time to dry afterwards before you stat applying the joint compound. Then you fill a Ziploc bag about 1/4-1/2 full with joint compound. Press, smush, squeeze all the product to one corner of the bag and squeeze all the air out before zipping it shut! Then the fun part!! Pretend you're a pastry chef or on an episode of cupcake wars and start squeezing the joint compound into your grout lines, ours were very deep so this took up a lot of product. We advise to work in small sections! Once you have your small section done, take your putty knife and smear it around. Smear until you get the look you want. You can discard some of the excess for more brick to show, OR you can use it all for more white. We used more white. This whole project took us about 5 hours! Here are some before, during and after pics. Enjoy, friends!

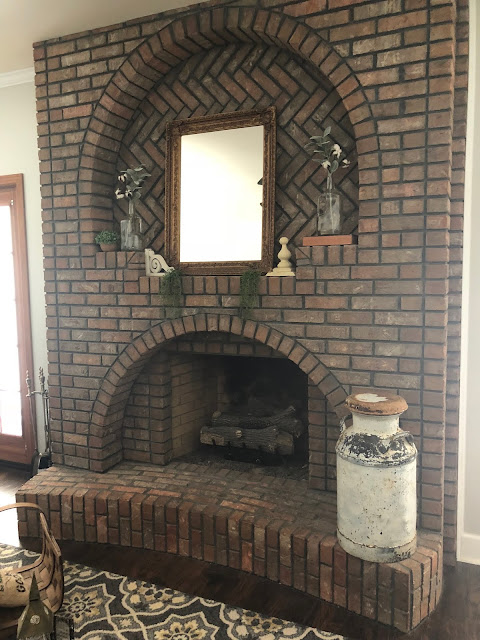
BEFORE! I loved the craftsmanship of this fireplace and it is honestly what sold me on the house originally BUT, it made the room feel so dark. Now, it brightens up the whole house!

This was right after we finished up!

Here is an example photo showing you how Steve was squeezing the joint compound in the grout lines.

This is during the schmear phase, ha!

Here are the after photos after I started decorating it. Still not perfect but I will keep looking for fun finds and décor to add along the way. We would love to add a huge reclaimed beam to the front for a true mantel.. wish us luck in finding the perfect one, one day! :)

Is there a difference in using joint compound versus brick mortar?
ReplyDeleteThis comment has been removed by the author.
Delete(Drywall) joint compound is not as durable in several ways. First of all, it cures by evaporation, not by chemical reaction as does mortar. It is not waterproof, or even water resistant. It can literally be washed off. Mortar is a masonry product and unaffected by water. It would also be difficult (impossible?) to stain-proof drywall compound. Mortar can be permanently sealed to resist stains with a masonry sealer.
DeleteJoint compound also shrinks as it dries. Depending on the depth of your joints, it will sink in some, and may crack. It's not meant to be applied heavily. Cracking can be easily fixed with a second application where needed.
Because joint compound comes ready-mixed, it is less labor intensive. Mortar must be mixed in small batches that can be worked in 20 minute intervals. Both can be cleaned up with water, but you must clean mortar before it sets up in about 30-45 minutes.
Mortar will add layer, depth, and texture to the project. Joint compound will allow the brick texture to show through, but does not add to that. Mortar will probably cost 50% more, and will involve more labor. It is also PREMANENT! You can add to it, but you cannot remove it. But if permanence, water resistance, and stain resistance is what you desire, it may be worth the extra labor and cost to add a bit more character.
I am wondering the same. Do you have to paint it after? Spacling is a bit chalky. How does it clean?
ReplyDeleteHouston Home Security We are really grateful for your blog post. You will find a lot of approaches after visiting your post. I was exactly searching for. Thanks for such post and please keep it up. Great work.
ReplyDeleteWhat a transformation the brick fireplace really brightens the room now.
ReplyDeleteA German schmear brick fireplace adds a rustic charm and warmth to any home, making it a cozy focal point. Similarly, only murders merch captures the show's quirky essence, allowing fans to bring a piece of the series into their lives. Both celebrate unique styles that enhance ambiance.
ReplyDeleteThe German Schmear brick fireplace adds a rustic charm to any home, showcasing a beautiful blend of textures and colors. Similarly, a well-designed streaming layout enhances your online presence, creating an inviting atmosphere for viewers. Both elements emphasize the importance of aesthetics, whether in interior design or digital content creation.
ReplyDeleteCool tutorial
ReplyDelete